20 Aug 2013

Me good at Up-styles??????Never.........well actually maybe yes!!!


The phrase " I Love to learn new things" is an understatement when it comes to me. Once it is creative in anyway I am sold and will always try my hand at it. So when I seen that the Dublin College of Hairdressing was running Up-style Courses I had to give it a go. 

Last year I took a hairdressing course but had to leave after only a few short weeks because of unforeseen circumstances so I didn't get to learn too much. I have never been very good at doing hair at all. Because I have naturally curly hair I never had the need to learn GHD curls or anything else fancy so when it came to up-styles I was a complete and utter virgin.

Louise is the owner of DCH. I have known Louise for years and know that she has worked incredibly hard to fulfill her dreams of having her own college so this in itself was a selling point for me because I knew she would only teach to her highest ability knowing that she has made her dreams come true. 

On the morning of the course I was surprisingly nervous. Maybe its because it was something new for me or maybe because I was putting myself under pressure to be good. I am not sure but whatever it was the butterflies were in full flight in my stomach that morning. 

Once I got in to the college Louise offered my some tea or coffee and I met the other girl who would be on the course and the nerves began to settle. The other girl was currently working in a hairdressers and I knew by looking at her beautifully tonged hair that she would breeze though the course, but that was great because she would be good motivation for me, the newbie. 

1st up-style-Basic using natural curl of hair
We started off with GHD curls which surprised me because I thought it was an up-style course but Louise informed us that no matter what up-style you do you should always have some sort of curl in it as this will make the style hold better. So Louise demonstrated how to do the curls and then let us have a go. I was a disaster to say the least but Louise was in no way inpatient, infact I dunno how she coped with me. She showed me as many times as I needed and stayed with me until I got it. She really put me at ease and eventually I got some sort of a reasonable curl.....Hooray!!! 

2nd Up-style-Using rollers to create volume

Louise then showed us how to do a basic up-style and as the day went on we moved on to more advanced techniques. The most impressive thing about the whole day was that she didn't show us how to do the old fashioned french roll type up-styles but more the modern up-styles that you would wear to a special event or even on a night out if you like that short of thing.....

3rd Up-style-Classic

My favourite style of the day had to be the last one which was the curly Mohawk. I have admired this hairstyle for years and always expected it to be complicated and way too difficult for me to attempt but again Louise showed us how to do it and we both came up with amazing results.
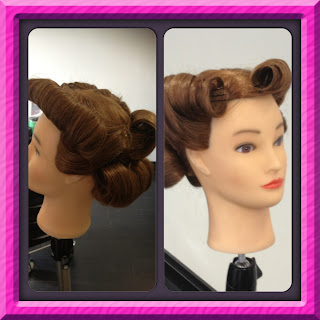
4th Upstyle- Vintage

Louise is a very calm and laid back person which really makes you feel at ease. She really encouraged our own creativity. If she didn't think something would work she would show us how she felt it would look better but never made you feel silly for not doing it right in the first place. She has an amazing approach to teaching and I should know because I went in to the course knowing nothing and I was honestly shocked at how well I did. I cannot recommend this course and any other of Louise's courses enough. I have no doubt this girl will shine. But the nicest thing about it all is that she has worked her little bum off to get what she wanted and so she deserves all the success she gets. Hard work always pays off in the long run. Her enthusiasm and genuine excitement about teaching is so inspirational that she had me walking out of the college thinking I wanted to be a hairdresser. Maybe I will leave that one until another day.........

5th Up-style- Curly Mohawk

Louise Offers a variety of courses from Dublin College of Hairdressing. From basic beginner courses to refresher and advanced training for qualified hairdressers aswell as ITEC certified courses. Her prices are so reasonable and the cheapest I have seen around, but don't let this turn you off because the standard of teaching is second to none and you will definitely get value for money in doing these courses. This up-style course ran from 10am until 4pm and it cost a very reasonable €85 (this is just an introductory price though).Louise was so kind that she sent us home with a lovely little kit of two different combs (a pin-tail and a backcombing brush) and a very large box of hair clips. Oh and to top it all off she gave us very informative handouts that we could read at home to get more info or to brush up on anything we had learned in the course. She didn't leave any page unturned. I walked in knowing nothing and walked out at 4pm knowing how to create beautiful up-styles aswell as not being afraid to try new things and reassurance that if something goes wrong that it can always be fixed and sometimes mistakes turn out to be the nicest creation. 

You can get more information on the college and the courses at http://www.dublincollegeofhairdressing.ie/. You can also find them on Facebook at http://www.facebook.com/dublincollegeofhairdressing.
Also a little side note, if you like this website and are interested in getting your own website done the designer of this website can be found at http://www.jcit.ie/ or at http://www.facebook.com/jcitdublin.

I hope you found this informative and be sure to check out the websites above for more information.

Have a lovely evening

Anita xxxx

17 Aug 2013

I got ZINCed and Loved it!!!


When I was invited to Zinc Hair & Beauty to try the Cocoa Brown Spray Tan by Marissa Carter and 3D Browz of course I was only delighted to give the treatments a go and even happier that it was at Zinc Hair & Beauty because I know how friendly and highly skilled the staff are there.

Zinc Hair&Beauty 637 South Circular Road.

When I walked in I was pleasantly greeted by the owner Lisa who was busy with a client and she asked me to take a seat and Tanya, the girl who would be looking after me today would be with me shortly. I was only seated and Tanya took me into the treatment room where she explained that she would do my 3D Browz treatment first and she asked me to lie up on the treatment bed. Ahhhh finally I can relax!!!!! Tanya then assessed my current brow shape and asked me what type of shape I would like and what colour tint I wanted. She also recommended that she gives my brows more definition. I knew I was in capable hands so I told her to do what she thought would suit me best. She then applied the tint and left it settle for a few minutes. Except for a split second Tanya didn't leave the room while the tint set which I thought was great because we got to have a chat about the Decoderm makeup that Zinc stock and use in the salon (review here) and she also was telling me about the new range of Decoderm nail polish that they got in in the last couple of days. I found her very easy to talk to and interesting at the same time which to me is so important when you are spending time alone with someone.


When the tint set Tanya then advised that she would wax, thread and trim my brows to the shape which would best suit me. Tanya was super quick at this and so the treatment was virtually pain free (even the threading which I don't particularly like). Once that was all done Tanya then wiped my brows and applied some sort of liquid (sorry not exactly sure what) which I think maybe sealed in the brow colour. She then showed me the finished result in a mirror and I have to say I was delighted. They looked much more defined and even though I had zero makeup on and I was as white as a porcelain doll I didn't look too bad because my face had definition. I was really delighted. I was very happy to see that the colour wasn't too dark and it blended well with my hair colour because for me their is nothing worse than having two huge thick, dark brows that just look like caterpillars on your face.

 Tanya did explain though that everyone has one eyebrow that can cause problems and needs more work and mine is my left one (don't I know it, it has caused me problems for years) so she explained that I should come back every six weeks and get them done and she will work on the shape and get them more uniform. I will definitely be doing that!!! I am a perfectionist and can see that my left brow is slightly thicker than the right and it will bother me for awhile but I have to take the advice of Tanya and trust her that by regular treatments this will be rectified over time. 3D Browz cost €30 per treatment at Zinc and they recommend you get the treatment done every 6 weeks to get a perfected result.

Brows Before being 3D Browz'd

After being 3D Browz'd

Next Tanya brought me into the room for my spray tan and told me that there was a hair net, disposable undies and some moisturiser to use if I felt I had dry patches. Seriously, does any other salon give you that much care??? None that I have been to anyway. So Tanya left me to get ready to be sprayed. When she came back in she asked how dark did I want to be and I said as dark as possible and she explained that like the Cocoa Brown 1 Hour tan the longer you leave it on the darker it will be. So she suggested leaving it on for 3 hours and then just giving it a light rinse and moisturise well. When Tanya finished spraying my whole body she then went over my legs a second time. I was taken back by this but thrilled because we all have had experiences where the tan takes beautifully all over the body and not on the legs so Tanya explained that by spraying them twice that this wouldn't happen....Hooray, its like she read my mind. Before I got dressed Tanya gave my skin a quick blast with a hairdryer to make sure I was dry all over(again another first for me)...although there was very little drying needed because the tan seemed to soak into my skin instantly.


The tan itself had the usual Cocoa Brown smell of Tahitian Gardenia (review of 1 Hour tan here) which is so pleasant rather the usual disgusting curry smell of other fake tans. The colour itself was almost instant, I felt I could go out on the town without even rinsing it off. A great thing when you have to go out in public after getting sprayed!! When I was on the way home the tan did start to run on my arms and legs which freaked me out a bit but it didn't make any difference at all so I would say this was only the colour guide running. The tan developed in an hour and I could see it getting darker up to the three hours after when I washed it off. I LOVE the colour of the tan, its dark enough but yet looks so natural. There wasn't a streak in sight (except for a tiny bit on my palms and bottom of my feet that shouldn't have been there...think this was my fault) and even the rougher areas like my ankles, knees and elbows were all perfect. This is down to the great work of Tanya and also the fact that I prepped my skin the night before with Cocoa Brown's new Tough Stuff body scrub (review here) which is available from Zinc for €3 for a 50 ml Sachet. I love the lack of fuss around this tan, you go in, get sprayed, get dressed almost instantly, have no sticky residue and wash it off after three hours (or one hour if you want a lighter tan) and you have perfect, streak free tan that lasts for days. It costs €20 to get a Cocoa Brown spray tan at Zinc.
Before                 After application      3 Hours later

Overall, my trip to Zinc Hair & Beauty was very pleasant, I got amazing services with impeccable results and got to meet some lovely people and try some great treatments along the way. I was so happy to have been ZINCed and plan on making it a regular place to visit to be beautified. Thanks for having me ladies and see you soon!

You can visit Zinc's website for more information on their staff and services they offer. http://www.zinchairandbeauty.com/

Love and Kisses
Anita xxxx


15 Aug 2013

Stubborn Tan? Tough Stuff's Your Man! (or your lovely pink lady in this case)!!!

Lately the only fake tan I have used is Cocoa Brown's 1 Hour tan and I haven't had much problems at all with it leaving tan clinging to dry areas (review here). Although depending on how well I prepped my skin before fake tan application I may get a little bit of stubborn old tan clinging to my dry ankles, knees, elbows or under my arms after a week or so.


I was sent the new Cocoa Brown "Tough Stuff" scrub to try out and was so happy with the results. This product is "A No Nonsense Scrub for Rough Areas such as feet, ankles, knees, elbows & hands". It can be used to:
-Prepare skin for fake tan application.
-Buff your skin to make it feel soft and smooth.
-Get rid of nasty old tan.

I am a massive fan of body scrubs because I tan regularly and like it to look as natural and even as possible so was very curious to give this new launch a go. I have tried a tonne of body scrubs, some better than others but I always find that they leave a residue on my skin. I also can never seem to manage to get rid of my old tan completely after using certain scrubs, I usually have to exfoliate and then use a dry rough towel on wet skin to get rid of the rest, with Tough Stuff there is no need for this last step.


Tough Stuff is housed is a 50 ml sachet. The packaging is as girly and eye catching as the other Cocoa Brown products. The only thing I would change is that I would love it to be packaged in either a 200 ml tube or a tub firstly because it would be much easier to use in the shower and secondly because it would mean that I would have a big container of this super scrub to the ready whenever needed.

On the back of the sachet there are some great application tips from Marissa Carter (owner and founder of the Cocoa Brown brand). She advises that the scrub can be applied to dry skin for a deeper exfoliation or wet skin for a more gentle scrub. She also doesn't recommend using the scrub on sensitive areas as it is very strong so we don't want to irritate the skin. Marissa also recommends that you do not use this scrub on the same day as applying tan so I used it today before getting a spray tan done tomorrow and avoided using it on my chest and decollete area. I just love how this little sachet has so much information on it, very user friendly.

So what did I think of the product?????


I used this on wet skin in the shower. I didn't have any old stubborn tan to remove so the purpose of me using this was just to really buff my skin and prepare it for fake tan application.

Well firstly it smells so sweet and girly which instantly had me hooked and of course its a pink colour which again added to the princess pampering experience. The texture reminds me of a really expensive salt scrub that you would get in a luxurious spa . And wait for it..... hooray not a single bit of residue left on the skin after I rinsed it off. I also find with other body scrubs that the grains don't all wash off in the shower. I think this is because the product is oil based and so does not melt in water and hence the residue. With Tough Stuff there is none of this fussing about. It rinses off completely and the only thing it leaves behind is super soft baby like skin that almost tingles it feels so fresh and new. My skin was slightly pinkish after use but it states on the back of the sachet that this is normal and it is down to the fact that it gives such a deep exfoliation!

I am a sucker for using up the whole sachet when I use them but with this product I couldn't use it all. I exfoliated my whole body (and didn't skimp on the application) and I still have enough left for another full body scrub which I cannot wait for! I absolutely LOVED using this scrub on my thighs and bum area. It really works the area well and really helps with all the nasty lumps and bumps that us ladies get in that dreaded area. I felt like I had a body brush and scrub all in one.

Yes the product looks and smells amazing and there is no doubt that it ticks all the girly boxes but all of this aside this product really is a very high quality, no nonsense product. It does exactly what a body scrub should do, it's as simple as that.

Well done Marissa for delivering yet again another amazing product that will be part of my body skincare routine for many years.

Tough Stuff is sold in all Cocoa Brown stockists and costs a tiny €2.99. Be sure to check it out and let me know what you think. I have no doubt you will adore it as much as I do.

Love and Cuddles
Anita xxxx

11 Aug 2013

Beautiful lips start with Balmi!

Whatever the weather, I always need to have a lipbalm with me. It's not necessarily that I have dry lips but more so that I just love the feeling of soft and subtle lips. I have used the Rosebud salve for years and still love that to this day but lately I am reaching for another balm more and more. Balmi's lip balms not only look super cool but they are really moisturising and contain SPF 15 and UVA Protection...Score!!!

Balmi have recently repackaged their balms into a new cube shape which to me looks like an ice cube. The lid is twist off which is very secure so won't open if you have it at the end of your handbag. When you open it up the actual balm is in a cone shape which is very handy for gliding across the lips without getting it all over your face. You also avoid having to dip your fingers into a pot which is much more hygienic. There is also a little black chord attached to the bottom of the cube which means that your fav Balmi lip balm can be attached to your keys or phone so you can have it on you all the time.


Although the cube packing is a little larger than the original round packaging I still think this balm is very convenient for popping in your handbag or in your pocket even if you are out for a walk. I think the ones shaped like balls are still available in some shops.

I do tend to use up Balmi Lip Balms very quickly. This is partly down to the fact that I apply it as much as possible but I do also think the product is very soft and so it tends to get used up quicker than other balms I have tried. However, this wouldn't stop me repurchasing them.


But really the main point to make about these little gems are that they are really great lip balms that provide great SPF protection for a very reasonable price (€6.79 in Boots).  They come in four flavours, coconut, mint, strawberry and raspberry, with mint being my absolute favourite.

I would highly recommend taking a look at these and see if you love them as much as I do.

Have a fab day my beauties xxx


7 Aug 2013

Stila "in the light" eye shadow palette.

The makeup market is flooded with neutral eye shadow palette's and they all look the part and in most cases have a beautiful selection of colours that are sure to get your heart a beating. I have tried almost all of them and like them all in their own little way. However, the one that has stood out to me the most, over all others is the Stila "in the light" eye shadow palette.


This compact palette consists of 10 show stopping colours that will bring your eye makeup look from day to night without having to touch another product. The palette contains 4 matte shades and 6 shimmering shades all of which in my opinion work flawlessly together to create amazing looks. It also contains a really top notch liner, the smudge stick waterproof eye liner in damsel (a deep brown shade). It costs around €32 (from Boots or anywhere you can find a Stila counter) which to me is a bargain because this palette is the only thing you will need to create any look using neutral shades,whether it be a look for popping to the shops or a dramatic smoky eye for a night on the tiles. This palette has it all!!


On the top row you have the following colours: (below from left to right top row)

Bare- A matte cream shade which I love to use as a highlight shade under the brow bone if I am using alot of shimmery shades on the lid and in the crease because it just brings harmony back to the look rather than having an over packed shimmery eye.

Kitten- This is a cult classic and I know why now. It is the most amazing champagne shimmering highlight shade that is super as a highlighter, in the inner corner of the eye or I often use it on the cheek bone to add a glow to my face. This is my favourite shade of them all.

Bliss- Another matte shade but this time a very flattering soft brown pinkish colour which for me is the perfect colour for blending into the crease to add depth and definition to your eyes.

Sunset- This is such a versatile shimmering copper colour that looks amazing on both the lid and in the crease.

Sandstone- A dark matte brown colour that is great for adding depth to any look. I tend to add this over Bliss but only in the outer V of my eye to add a gradient effect to my eye shadow.


On the bottom row the colours are also amazing: (above from left to right bottom row)

Bubbly- Oh what can I say, the most amazing golden shimmery shade I have tried. This is lovely all over the lid with bliss in the crease for a simple everyday look.

Gilded Golden- This is a fab medium brown colour with golden sparkles. Again fab all over the lid or for adding dimension to the crease of the eye. Yummy!!

Luster- This is a deeper aubergine shade with golden shimmer in it. The shimmer isn't too obvious but just adds a little something extra to a look.

Night Sky- Is a Greyish blue colour that is amazing on all eye colours. I love this colour because its totally different to the rest. I like to wear this as part of a strong smoky eye.

Ebony- Finally this shade is a really pigmented matte black. This is a must for any smokey eye look. I often use this as an eyeliner on days when I don't want to use a cream or pencil liner. Also amazing for smoking out the corners of the eyes or the crease.

Overall the shadows are highly pigmented. I love that they are almost creamy to feel and so blend effortless which means that creating a smoky eye look isn't difficult as the shadows work with you.


There is some downfalls to this palette and the first is that the shadows do tend to fall down under your eye if you use too much so to avoid this I would recommend using a primer to prime the lids and then also only apply the shadow to one side of your eye-shadow brush and pat the product on the lid which will prevent too much fall out. I also am not a massive fan of the packaging of the product. Because it is cardboard it can tend to get a little battered if you travel alot and can also get a little grubby. Although I do LOVE that it comes with a great size mirror on the lid of the palette and also that it has a magnetic close on it to stop it opening when you are on the move. But my favourite thing about the packaging is the cute little quote above the mirror "believe in the beauty of the future"....very positive start to the day seeing this every morning....
If the packaging was more like the Urban Decay Naked 2 (definitely not the Naked palette) in a tin box then I would be one happy camper!!!

As if the eye shadows weren't amazing enough Stila really knocked my socks off with the lovely liner they included in this palette. Its in the shade Damsel which is the nicest rich brown colour I have used, in fact this is my favourite eye liner pencil I have ever used....it even tops Avon's Supershock liner which was my holy grail for years. As the name suggests it is smudgeable but you do need to work fast with the smudging because it is also a waterproof product so it tends to set dry pretty quickly and once it sets it ain't coming off too easily. I use it daily on my upper lash line and it doesn't move. It doesn't last all day on my waterline but it does tend to last a few hours so would be great for nights out or during the day if you don't mind touching up your waterline once or twice. I love this little beauty.

This palette has been compared to the original Urban Decay Naked palette and I can see the similarities because they have similar shades but in my opinion this palette is better. The shadows are much easier to blend and the shades just have a slight edge over the UD Naked ones.....just my opinion...!!!

I hope you found this post informative and if you would like to ask me any questions please feel free.

Have a great day my beauties. xxxxx

3 Aug 2013

COMPETITION TIME: Loads to be won!

Hi Everyone,
So it's competition time on my Facebook page again and this time there are three fab prizes up for grabs.

The first prize is this amazing 6 piece Dare to Wear floral fantasy nail polish collection and this will be given away when my Facebook page reaches 700 likes.


The next prize will be given away when my Facebook page reaches 800 likes and it is this fab 12 piece pink brush set with pink brush roll. Such a lovely set to add to your collection.


And then when we reach 1000 likes I will be giving away this amazing purple brush set which comes with a fab brush holder. This is a great quality set.


So how do you enter?
-Well firstly you must have liked my page
-Next you must like and share the picture on my facebook page with all your facebook friends,
-Then comment below the picture to say you have done all of the above
-Finally keep your fingers crossed and hope that you win.

All winners will be picked at random and everyone has a fair chance of winning once they have met all of the above criteria. I wish you all the best of luck and thank you for sharing my page.

The link to my facebook page is http://www.facebook.com/KissandMakeupwithMe

Thank you xxx


L'oreal's Latest Lovely-Micellar Water

So I think everyone knows by now that I am a makeup addict but I do also know that if I choose to wear alot of makeup that I must be willing to take it all off before going to bed to ensure that my skin stays as young and breakout free as possible. I always seen the Youtube Guru's using Bioderm which was a cleansing water that seemed to remove all traces of makeup. However, Bioderm isn't easy to get my hands on so when I seen that other cosmetic brands had jumped on the band wagon I was keen to go along for the ride.


So I chose to try L'oreal Paris Skin Perfection 3 in 1 Purifying Micellar Solution. So what is a Micellar cleansing water then? Well supposedly the French have used it for years and we are just really late to give it a go. It is basically a solution that has tiny oil particles in it that claims to break down the makeup fast and without being abrasive to the skin.It just feels like you are applying water to your skin. The L'oreal Paris version also claims to be a makeup remover, toner and skin smoother while drawing out impurities and excess oil.


So how did I get on with this product?

I have to admit I do not use this product on its own. I use this as the first step in my cleansing routine. I will take a small amount on a cotton pad and swipe it over my face and neck (I can repeat this step up to three times when I have alot of makeup on) and then I use a seperate soaked pad to remove my eye makeup. It removes all traces of eye makeup and I never have mascara left under my eyes the morning after. However, it does leave a tiny amount of foundation on my face and so I like to use my everyday cleanser (currently Michael Todd Honey and Oat Cleanser) with my Clarisonic to remove the rest. I have seen people use their normal cleanser then use the Micellar solution afterwards so it really depends on what you prefer.

Since introducing this product into my skincare regime I have definitely seen an improvement in my breakouts, they are alot less frequent and my skin looks clearer and cleaner than normal. When I use it my skin feels clean and refreshed but not irritated or sensitized.

The only down side I would say to this product is that I feel I need to use ALOT to see a benefit from it but I feel it is worth it and because it isn't expensive I don't mind so much.Also, if I apply to much to a cotton pad and take my eye makeup off my eyes can sting so just be careful around the eye area and you should be fine.

All in all a great little addition to my skincare regime and I think I will be using this for awhile yet. It can be purchased from boots and is available at a discounted price of €4.46 for 200ml at the moment so be sure to check it out.